지난 포스팅으로부터 트랜스포머 아키텍처가 인코더와 디코더로 이뤄져 있다는 사실을 확인했습니다.
이때, 트랜스포머 아키텍처를 활용한 모델은 크게 세 가지로 나눌 수 있습니다.
- 인코더만 활용: 자연어 이해(Natural Language Understanding, NLU)
- 디코더만 활용: 자연어 생성(Natural Language Generation, NLG)
- 인코더와 디코더 모두 활용
각 모델들은 서로 다른 장단점이 존재합니다.
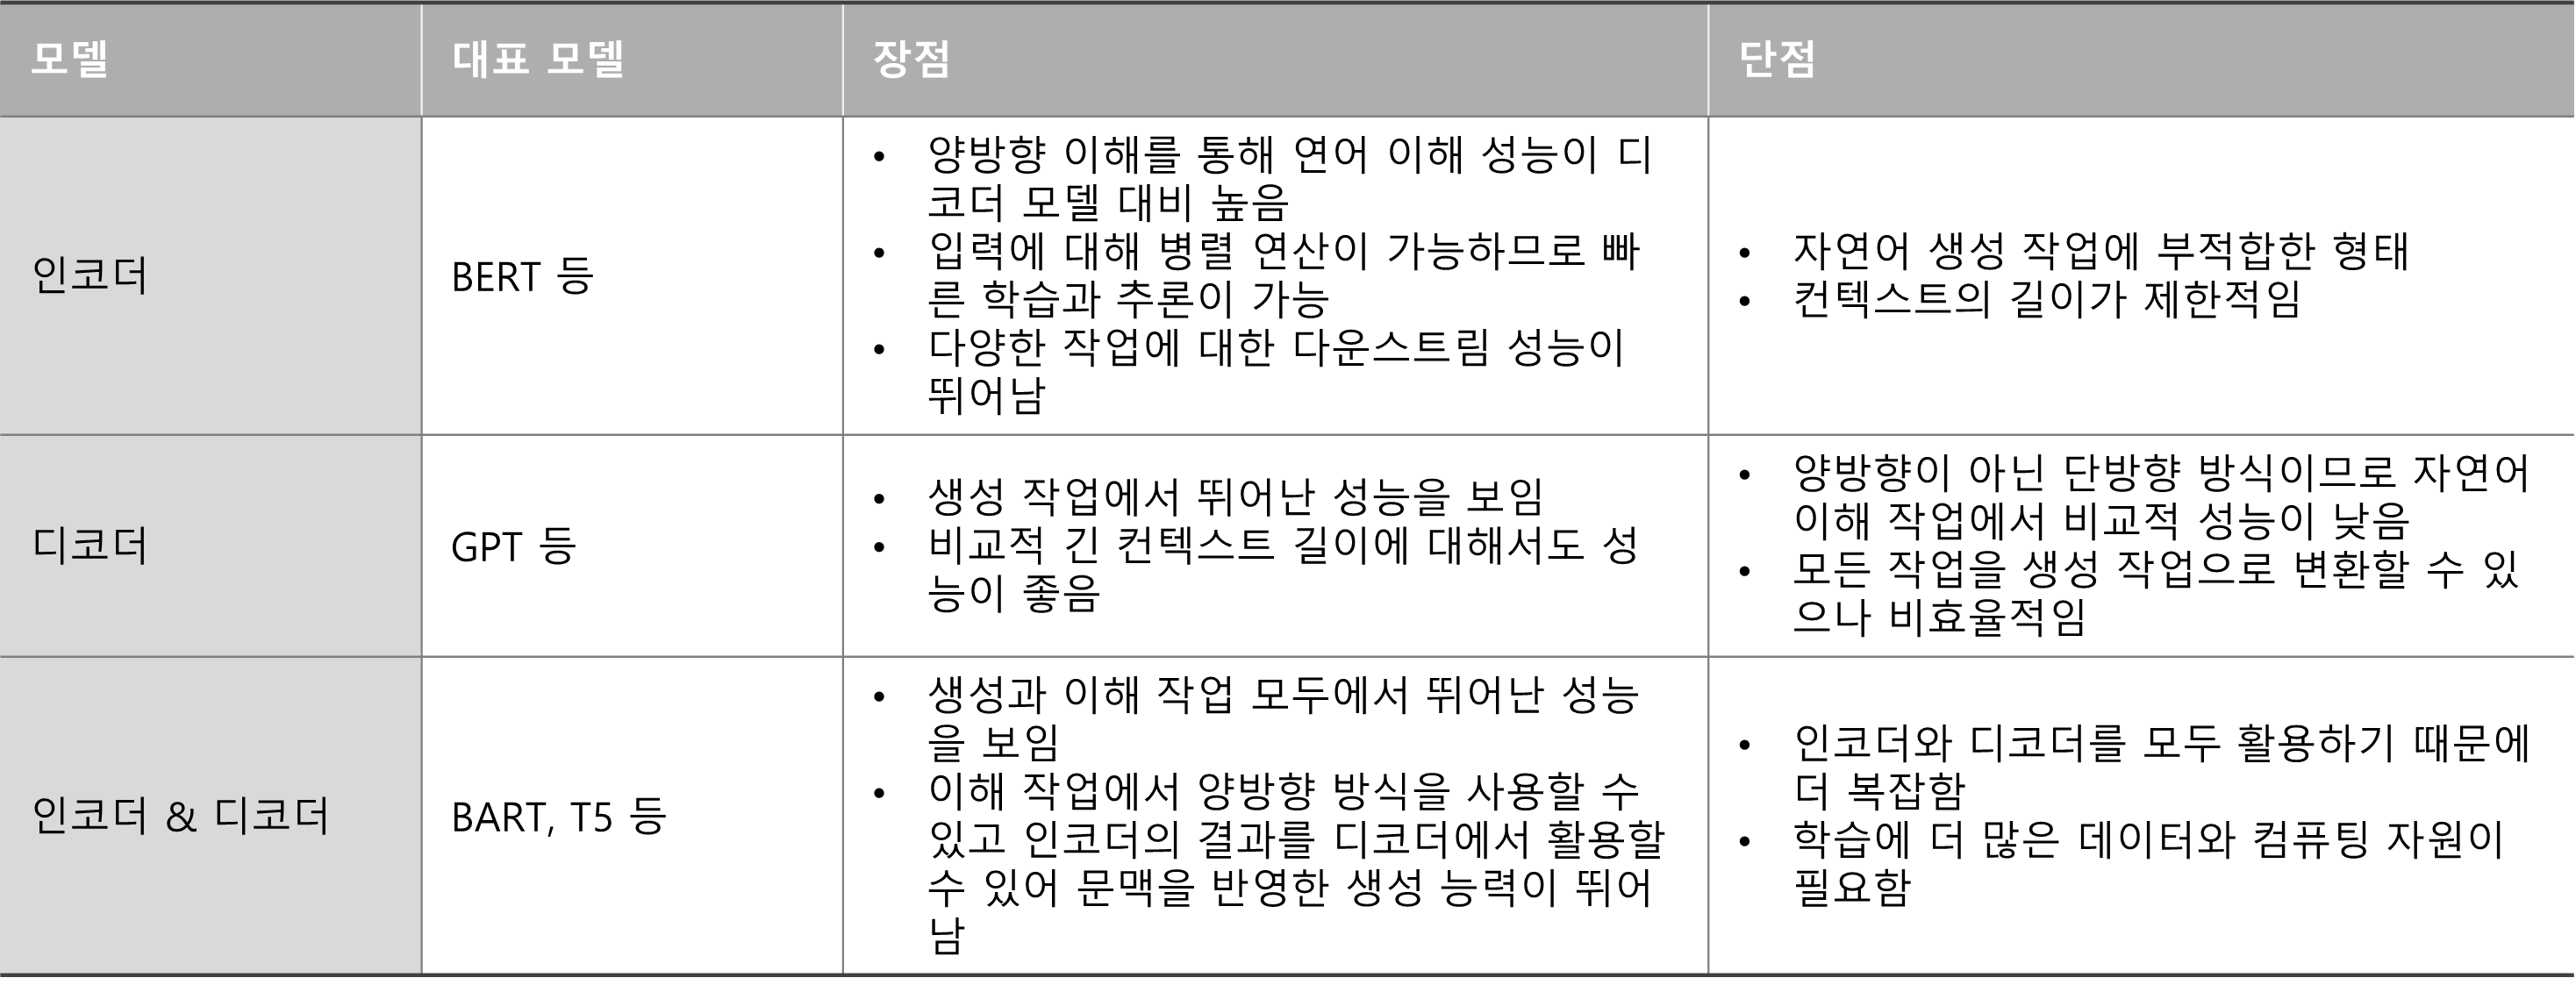
각 모델마다 잘 할 수 있는 일이 다르기에 모두 숙지하는 것이 필요합니다.
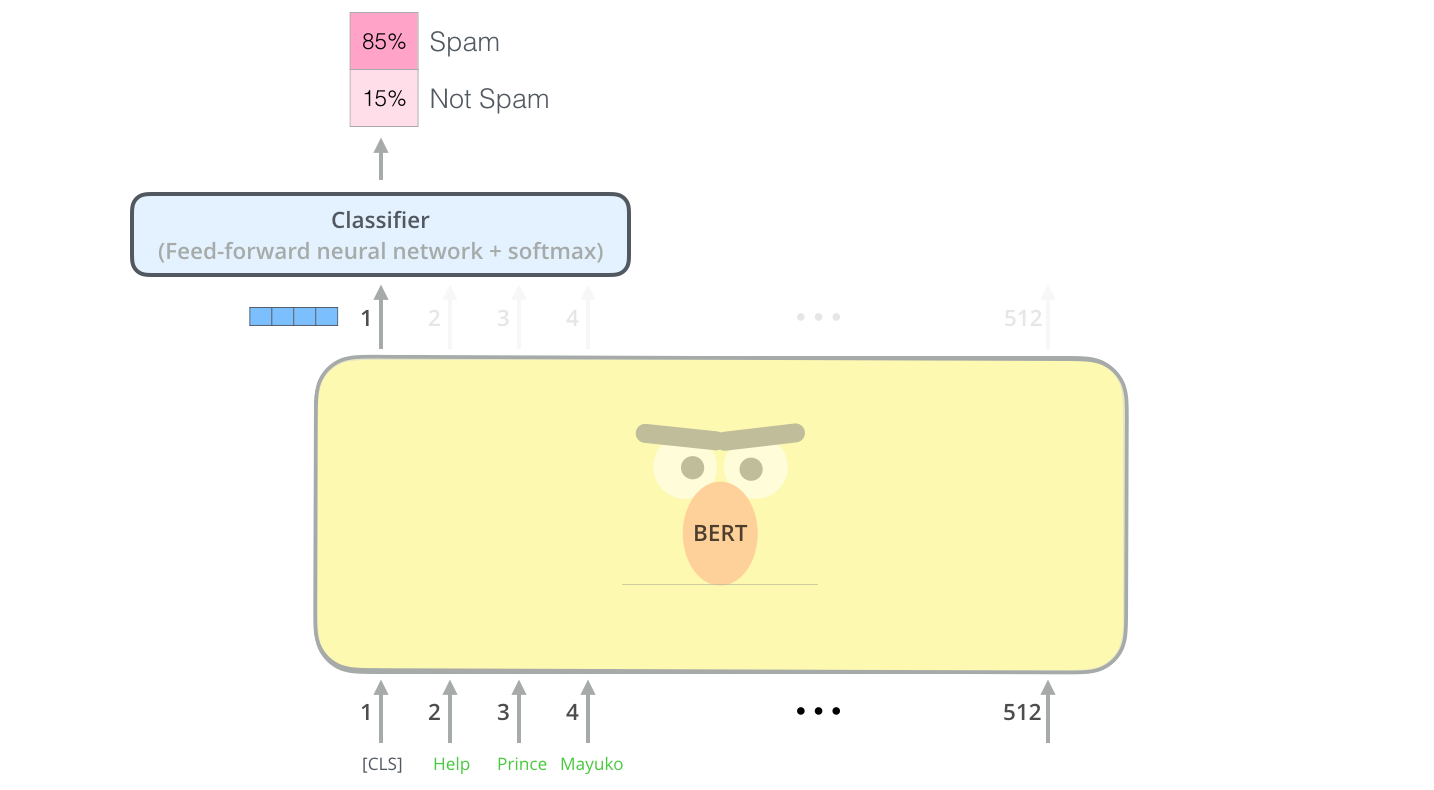
이번 포스팅에서는 대표적인 구글의 인코더 모델인 BERT에 대해서 알아보도록 하겠습니다.
1. What?
구글에서 개발한 BERT(Bidirectional Encoder Representations from Transformers)은 이름에서 나타나있듯이 양방향 문맥을 모두 고려하여 텍스트를 이해합니다.
BERT: Pre-training of Deep Bidirectional Transformers for Language Understanding
We introduce a new language representation model called BERT, which stands for Bidirectional Encoder Representations from Transformers. Unlike recent language representation models, BERT is designed to pre-train deep bidirectional representations from unla
arxiv.org
본 논문은 언어 모델(Language Model)에서 사전 학습(Pre-training)에 대한 중요성과 기존 모델의 한계점 대해 설명하면서 서론을 시작하고 있습니다.
- 언어 모델의 사전 학습은 다양한 자연어 처리 작업(자연어 추론, 의역 등)을 향상시키는 데 효과적임이 입증됨.
- 이는 문장을 전체적으로 분석하여 문장 간 관계를 예측하는 것을 목표로 함.
- 사전 학습된 언어 표현(Representation)을 다운스트림 작업에 적용하는 전략 중 미세 조정 방식(Fine-Tuning)은 최소한의 작업별 파라미터를 도입하여, 모든 사전 학습된 파라미터를 단순히 미세 조정하여 다운스트림 작업에 대해 학습됨.
- 하지만, 현재 기술 및 모델들은 단방향으로 텍스트를 학습하기 때문에 미세 조정 방식에서 사전학습된 텍스트 표현의 잠재력을 제안함.
이제 BERT가 어떻게 양방향으로 텍스트를 학습하는지 알아보겠습니다.

2. How?
위에서 언급했듯이, BERT는 2)양방향 문맥을 고려한 1)텍스트 임베딩 모델입니다.
즉, 1)이기 때문에, BERT는 텍스트를 어떤 숫자로 이루어진 벡터로 변환하는 것이 목적입니다.
※ BERT 뿐만이 아닌 텍스트 임베딩 모델의 기본 개념
예를 들어, 다음과 같은 두 문장이 있다고 가정해봅시다.
A: He got bit by Python. (파이썬이 그를 물었다.)
B: Python is my favorite programming language. (내가 가장 좋아하는 프로그래밍 언어는 파이썬이다.)
두 문장에서 'Python'이라는 단어의 의미가 서로 다르다는 것을 알 수 있습니다.
이때, Word2Vec과 같은 임베딩 모델을 사용해 해당 단어의 임베딩을 확인해 보며 동일하게 표현되는 것을 알 수 있습니다.
※ 이러한 종류의 임베딩을 '정적(Static) 임베딩'이라 부릅니다.
from gensim.models import KeyedVectors

word2vec_model = KeyedVectors.load_word2vec_format('GoogleNews-vectors-negative300.bin', binary=True)

word_vector = word2vec_model['Python']

print(f"Vector for 'Python': {word_vector}" )
'''
Vector for 'Python': [ 1.63085938e-01 -2.04101562e-01 -2.20947266e-02  7.95898438e-02
 -2.01171875e-01 -3.75366211e-03  1.49414062e-01  3.24218750e-01
  1.36718750e-01  2.96875000e-01  8.10546875e-02 -7.12890625e-02
  2.16064453e-02 -3.49121094e-02 -1.48437500e-01 -2.51953125e-01
  1.58203125e-01  2.63671875e-01 -5.07812500e-01 -3.12500000e-01
 -8.20312500e-02  9.13085938e-02  2.30468750e-01  3.57421875e-01
 -3.61633301e-03 -2.26562500e-01 -1.03515625e-01  4.16015625e-01
 -1.30004883e-02 -2.79296875e-01 -7.76367188e-02  7.76367188e-02
 ...
'''
print(f"Vector shape: {word_vector.shape}") # Vector shape: (300,)
이렇게 되면 상대적으로 단어에 내재돼있는 의미들을 표현하는 데 제약이 발생하게 됩니다.
따라서, 문장 내에서 단어들의 의미를 파악하기 위해서는 문장의 각 단어를 문장의 다른 모든 단어와 연결시켜 이해해야 합니다.
아래는 BERT를 통해 도출된 문장 A와 B에서의 단어간 상관성을 시각화한 이미지입니다.
from transformers import AutoTokenizer, AutoModel, utils
from bertviz import model_view
utils.logging.set_verbosity_error()

model_name = "bert-base-uncased"
input_text = "He got bit by Python"  # Python is my favorite programming language
model = AutoModel.from_pretrained(model_name, output_attentions=True)
tokenizer = AutoTokenizer.from_pretrained(model_name)
inputs = tokenizer.encode(input_text, return_tensors='pt')
outputs = model(inputs)
attention = outputs[-1]
tokens = tokenizer.convert_ids_to_tokens(inputs[0])
model_view(attention, tokens)
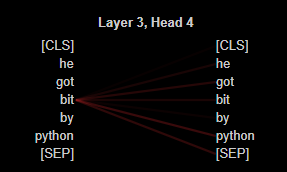
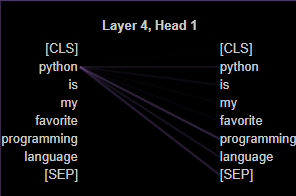
이미지에서 볼 수 있듯이 같은 'python'이라도 문장 내에서 서로 다른 단어와 강한 상관관계를 나타내는 것을 알 수 있습니다.
※ 이를 '동적(Dynamic) 임베딩'이라 부릅니다.
사실, BERT가 이렇게 문맥을 고려할 수 있게된 이유는 트랜스포머의 인코더가 언텐션 메커니즘으로 설계되어 애초에 각 단어에 대한 문맥을 파악할 수 있기 때문입니다.
※ Query, Key, Value를 통해 모든 단어와의 연관성을 파악했습니다.
즉, 우리가 트랜스포머의 구조를 잘 이해했다면 BERT가 문맥을 파악할 수 있는 이유에 대해 추가적으로 공부할 필요가 없습니다.
이제 우리가 공부해야할 부분은 기존 트랜스포머 인코더와의 차이점입니다.
2.1. Input
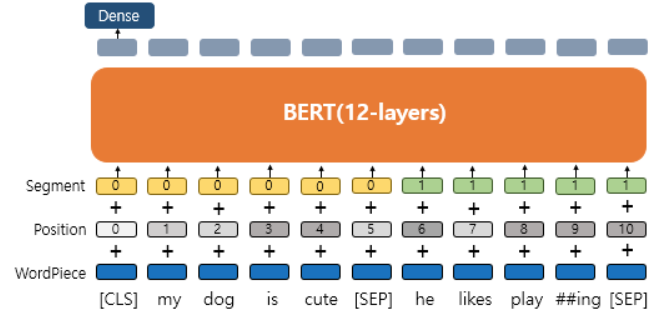
BERT에 데이터를 입력하기 전 다음 세 가지 임베딩 레이어를 기반으로 입력 데이터를 임베딩으로 변환해야 합니다.
- 토큰 임베딩(Token Embedding) → WordPiece
- 세그먼트 임베딩(Segment Embedding)
- 위치 임베딩(Position Embedding)
트랜스포머의 임베딩에서 세그먼트 임베딩이 추가된 형식입니다.
하지만, 토큰 임베딩에서 WordPiece라는 임베딩 알고리즘을 사용했는데 이것부터 알아보겠습니다.
2.1.1. WordPiece
WordPiece는 주어진 단어 혹은 문장을 몇몇의 하위 단어(Subword)로 분리하는 기법 중 하나입니다.
BPE(Byte-Pair Encoding) 토크나이저와 상당히 유사한 부분이 있습니다.
※ BPE에 대해서는 추후에 다루도록 하겠습니다.
그럼 왜 하위 단어로 분리해야할까요?
BERT와 같이 사전학습 모델들은 여러 코퍼스(Corpus)를 통해 자연어를 이해해야하는 과제를 가지고 있습니다.
또한, 이러한 사전학습 모델은 기본적으로 Look-up 테이블 형식으로 표현을 제공합니다.
※ BERT에서는 30,000개의 단어를 768차원으로 표현하고 있습니다.
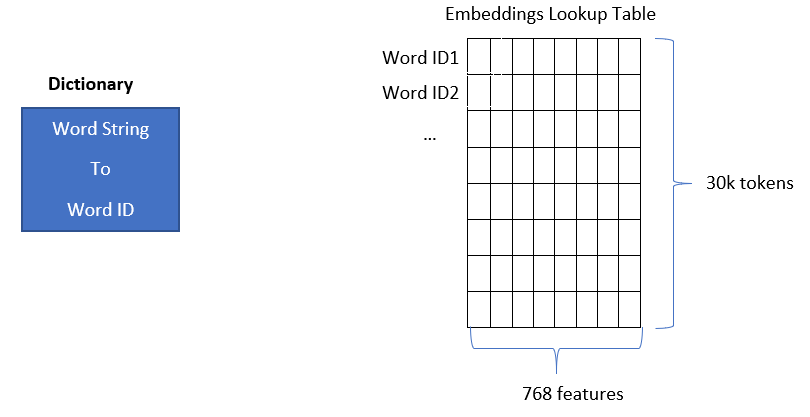
하지만 우리가 사용하는 언어(자연어)는 그 형태와 쓰임새가 매우 다양하기 때문에 모든 단어에 대해서 표현 벡터를 생성하는 것에는 제한이 발생합니다.
즉, 어떤 텍스트를 입력하고 표현을 받을 때 OOV(Out-Of-Vocabulary) 문제가 발생할 수 있습니다.
이런 문제를 효과적으로 대응하기 위해 사전 학습 모델에서는 텍스트를 입력할 때 단어들을 쪼개서 최대한 일반적인 형태로 바꾸는 노력들이 이루어지고 있습니다.
예를 들어, work와 worker를 다른 단어로 보지말고 work + er로 생각하는 것입니다.
그리고 er에 대해 표현을 생성해 놓으면, driver, oiler 등 뒤에 er이 붙는 단어들에 대해서도 대응할 수 있기 때문에 OOV 문제를 완화시킬 수 있을 것 입니다.
이런 느낌에서 등장한 WordPiece 임베딩에서 어떻게 사전들을 만드는지 알아보겠습니다.
1) 우선, 주어진 문장들을 모두 알파벳 레벨에서 분리하여 사전에 추가합니다.
※ 이때, 단어의 시작에 위치하는 알파벳을 제외하고는 모두 '##'를 붙여줍니다.
from transformers import AutoTokenizer
from collections import defaultdict

tokenizer = AutoTokenizer.from_pretrained("bert-base-cased")
word_freqs = defaultdict(int)
alphabet = []

corpus = [
    "This is the Hugging Face course.",
    "This chapter is about tokenization.",
    "This section shows several tokenizer algorithms.",
    "Hopefully, you will be able to understand how they are trained and generate tokens.",
]

for text in corpus:
    words_with_offsets = tokenizer.backend_tokenizer.pre_tokenizer.pre_tokenize_str(text)
    new_words = [word for word, offset in words_with_offsets]
    for word in new_words:
        word_freqs[word] += 1

for word in word_freqs.keys():
    if word[0] not in alphabet:
        alphabet.append(word[0])
    for letter in word[1:]:
        if f"##{letter}" not in alphabet:
            alphabet.append(f"##{letter}")

alphabet.sort()
print(alphabet)
"""
['##a', '##b', '##c', '##d', '##e', '##f', '##g', '##h', '##i', '##k', '##l', '##m', '##n', '##o', '##p', '##r', '##s', '##t', '##u', '##v', '##w' ...
"""
2) 사전에 존재하는 토큰을 만들 수 있는 페어 중 실제 단어에서 사용된 횟수를 가지고 아래의 수식을 통해 스코어 값을 산출합니다.
※ 이 부분이 BPE와의 가장 큰 차이점입니다.

vocab = ["[PAD]", "[UNK]", "[CLS]", "[SEP]", "[MASK]"] + alphabet.copy()

splits = {
    word: [c if i == 0 else f"##{c}" for i, c in enumerate(word)]
    for word in word_freqs.keys()
}

def compute_pair_scores(splits):
    letter_freqs = defaultdict(int)
    pair_freqs = defaultdict(int)
    for word, freq in word_freqs.items():
        split = splits[word]
        if len(split) == 1:
            letter_freqs[split[0]] += freq
            continue
        for i in range(len(split) - 1):
            pair = (split[i], split[i + 1])
            letter_freqs[split[i]] += freq
            pair_freqs[pair] += freq
        letter_freqs[split[-1]] += freq

    scores = {
        pair: freq / (letter_freqs[pair[0]] * letter_freqs[pair[1]])
        for pair, freq in pair_freqs.items()
    }
    return scores

pair_scores = compute_pair_scores(splits)
for i, key in enumerate(pair_scores.keys()):
    print(f"{key}: {pair_scores[key]}")
    if i >= 5:
        break

"""
('T', '##h'): 0.125
('##h', '##i'): 0.03409090909090909
('##i', '##s'): 0.02727272727272727
('i', '##s'): 0.1
('t', '##h'): 0.03571428571428571
('##h', '##e'): 0.011904761904761904
"""

best_pair = ""
max_score = None
for pair, score in pair_scores.items():
    if max_score is None or max_score < score:
        best_pair = pair
        max_score = score

print(best_pair, max_score) # ('a', '##b') 0.2
3) 가장 높은 스코어 값을 가진 페어를 사전에 등록합니다. (위의 결과에서는 ab)
vocab.append("ab")

def merge_pair(a, b, splits):
    for word in word_freqs:
        split = splits[word]
        if len(split) == 1:
            continue
        i = 0
        while i < len(split) - 1:
            if split[i] == a and split[i + 1] == b:
                merge = a + b[2:] if b.startswith("##") else a + b
                split = split[:i] + [merge] + split[i + 2 :]
            else:
                i += 1
        splits[word] = split
    return splits

splits = merge_pair("a", "##b", splits)
splits["about"] # ['ab', '##o', '##u', '##t']
# 기존 "about": 'about': ['a', '##b', '##o', '##u', '##t']
4) 업데이트된 사전을 가지고 다시 2) ~ 3) 과정을 반복합니다. (정해진 사전 크기에 도달할 때까지)
vocab_size = 70
while len(vocab) < vocab_size:
    scores = compute_pair_scores(splits)
    best_pair, max_score = "", None
    for pair, score in scores.items():
        if max_score is None or max_score < score:
            best_pair = pair
            max_score = score
    splits = merge_pair(*best_pair, splits)
    new_token = (
        best_pair[0] + best_pair[1][2:]
        if best_pair[1].startswith("##")
        else best_pair[0] + best_pair[1]
    )
    vocab.append(new_token)
최종 완성된 사전을 통해 "This is the Hugging Face course!" 문장을 토큰화해보겠습니다.
def encode_word(word):
    tokens = []
    while len(word) > 0:
        i = len(word)
        while i > 0 and word[:i] not in vocab:
            i -= 1
        if i == 0:
            return ["[UNK]"]
        tokens.append(word[:i])
        word = word[i:]
        if len(word) > 0:
            word = f"##{word}"
    return tokens

def tokenize(text):
    pre_tokenize_result = tokenizer._tokenizer.pre_tokenizer.pre_tokenize_str(text)
    pre_tokenized_text = [word for word, offset in pre_tokenize_result]
    encoded_words = [encode_word(word) for word in pre_tokenized_text]
    return sum(encoded_words, [])

tokenize("This is the Hugging Face course!")
"""
['Th',
 '##i',
 '##s',
 'is',
 'th',
 '##e',
 'Hugg',
 '##i',
 '##n',
 '##g',
 'Fac',
 '##e',
 'c',
 '##o',
 '##u',
 '##r',
 '##s',
 '##e',
 '[UNK]']
"""
2.1.2. Segment Embedding
세그먼트 임베딩은 주어진 두 문장을 구별하는 데 사용됩니다.
세그먼트 임베딩 레이어는 입력에 대한 출력으로 E_A, E_B만 반환합니다.
입력 토큰이 A 문장에 속하면 토큰이 E_A에 매핑되고, B 문장에 속하면 E_B에 매핑됩니다.
2.1.3. Final Embedding
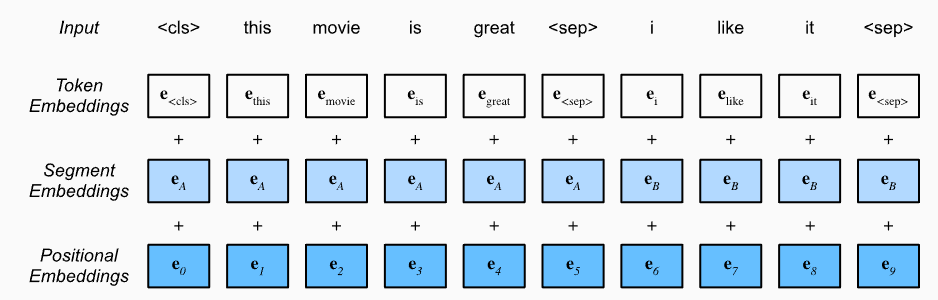
아래의 그림처럼 먼저 주어진 입력 문장을 세그먼트 임베딩, 위치 임베딩, 토큰 임베딩 값으로 변환하고 합산해 최종 입력 데이터로 BERT에 제공하게 됩니다.
2.2. Training Method
BERT는 다음 두 가지 태스크을 통해 사전 학습됩니다.
- 마스크 언어 모델링(Masked Language Modeling, MLM)
- 다음 문장 예측(Next Sentence Prediction, NSP)
2.2.1. MLM
마스크 언어 모델링은 주어진 입력 문장에서 전체 단어의 일정 비율을 무작위로 마스킹하고 마스크된 단어를 예측하도록 모델을 학습시키는 것입니다.
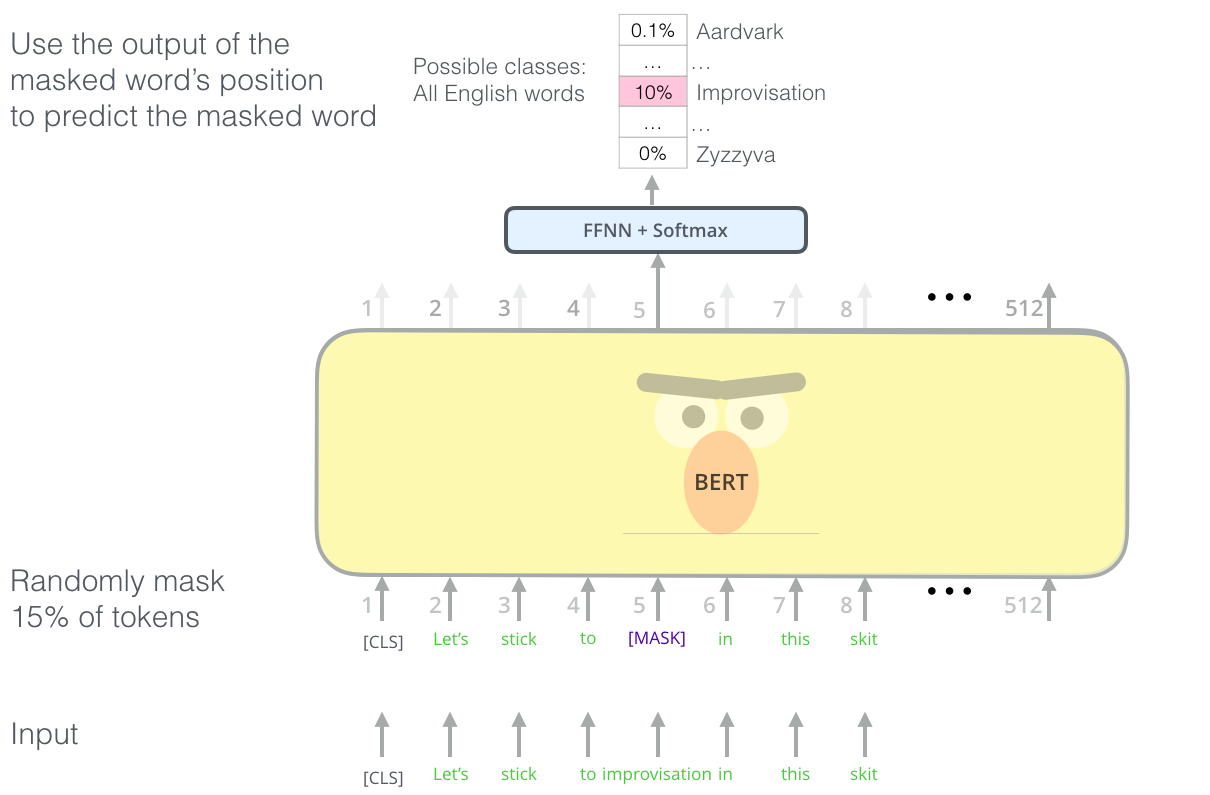
크게 아래와 같은 과정으로 훈련됩니다.
- 훈련 텍스트 데이터의 토큰 중 15%를 임의로 마스킹합니다.
- 마스킹된 문장을 모델에 입력하고, 마스킹된 위치에 있는 단어를 추론하도록 합니다.
- 추론한 단어와 정답 단어 간의 오차를 계한하여 모델을 학습시킵니다.
간단하게 마스킹하는 코드와 학습하는 방법을 코드로 알아보겠습니다.
우선, 텍스트를 불러오겠습니다.
from transformers import BertTokenizer, BertForMaskedLM
import torch

tokenizer = BertTokenizer.from_pretrained("bert-base-uncased")
model = BertForMaskedLM.from_pretrained("bert-base-uncased")

with open("clean.txt", "r") as fp:
    text = fp.read().split("\n")

text[:5]
"""
['From my grandfather Verus I learned good morals and the government of my temper.',
 'From the reputation and remembrance of my father, modesty and a manly character.',
 'From my mother, piety and beneficence, and abstinence, not only from evil deeds, but even from evil thoughts; and further, simplicity in my way of living, far removed from the habits of the rich.',
 'From my great-grandfather, not to have frequented public schools, and to have had good teachers at home, and to know that on such things a man should spend liberally.',
 "From my governor, to be neither of the green nor of the blue party at the games in the Circus, nor a partizan either of the Parmularius or the Scutarius at the gladiators' fights; from him too I learned endurance of labour, and to want little, and to work with my own hands, and not to meddle with other people's affairs, and not to be ready to listen to slander."]
"""
그리고 불러온 텍스트를 토큰화시켜준 후 마스킹하기 전 모든 input_ids 값을 labels로 저장해서 보관합니다.
※ 정답으로 사용될 예정입니다.
inputs = tokenizer(text, return_tensors="pt", max_length=512, truncation=True, padding = "max_length")
inputs
"""
{'input_ids': tensor([[  101,  2013,  2026,  ...,     0,     0,     0],
        [  101,  2013,  1996,  ...,     0,     0,     0],
        [  101,  2013,  2026,  ...,     0,     0,     0],
        ...,
        [  101,  3459,  2185,  ...,     0,     0,     0],
        [  101,  2043, 15223,  ...,     0,     0,     0],
        [  101,  7887,  3288,  ...,     0,     0,     0]]), 'token_type_ids': tensor([[0, 0, 0,  ..., 0, 0, 0],
        [0, 0, 0,  ..., 0, 0, 0],
        [0, 0, 0,  ..., 0, 0, 0],
        ...,
        [0, 0, 0,  ..., 0, 0, 0],
        [0, 0, 0,  ..., 0, 0, 0],
        [0, 0, 0,  ..., 0, 0, 0]]), 'attention_mask': tensor([[1, 1, 1,  ..., 0, 0, 0],
        [1, 1, 1,  ..., 0, 0, 0],
        [1, 1, 1,  ..., 0, 0, 0],
        ...,
        [1, 1, 1,  ..., 0, 0, 0],
        [1, 1, 1,  ..., 0, 0, 0],
        [1, 1, 1,  ..., 0, 0, 0]])}
"""
inputs["labels"] = inputs.input_ids.detach().clone() # MASK 전 input 토큰 아이디 복사 및 저장
inputs.keys()
이제 마스킹될 단어들을 추출하기 위해 입력된 토큰의 차원만큼 확률 값들을 랜덤으로 생성 후 0.15 미만인 값들을 True로 변환합니다.
rand = torch.rand(inputs.input_ids.shape) # MASK가 될 단어 확률 랜덤 생성
rand
'''
tensor([[0.4656, 0.1426, 0.5951,  ..., 0.4812, 0.7355, 0.2887],
        [0.6639, 0.1595, 0.5344,  ..., 0.8885, 0.6703, 0.6847],
        [0.7373, 0.8064, 0.2240,  ..., 0.1051, 0.2419, 0.7774],
        ...,
        [0.6007, 0.9954, 0.8935,  ..., 0.7104, 0.3595, 0.2703],
        [0.5422, 0.9391, 0.8299,  ..., 0.7187, 0.2115, 0.8599],
        [0.6064, 0.8550, 0.5404,  ..., 0.0661, 0.9608, 0.7243]])
'''
mask_arr = (rand < 0.15)
mask_arr
"""
tensor([[False,  True, False,  ..., False, False, False],
        [False, False, False,  ..., False, False, False],
        [False, False, False,  ...,  True, False, False],
        ...,
        [False, False, False,  ..., False, False, False],
        [False, False, False,  ..., False, False, False],
        [False, False, False,  ...,  True, False, False]])
"""
하지만, 이 True 값들은 [PAD]와 [CLS] 등 특수 토큰들이 고려되지 않았기 때문에 같이 고려하면 아래와 같습니다.
mask_arr = (rand < 0.15)  * (inputs.input_ids != 101) * (inputs.input_ids != 102) * (inputs.input_ids != 0) # CLS, SEP, PAD 제외
mask_arr
"""
tensor([[False,  True, False,  ..., False, False, False],
        [False, False, False,  ..., False, False, False],
        [False, False, False,  ..., False, False, False],
        ...,
        [False, False, False,  ..., False, False, False],
        [False, False, False,  ..., False, False, False],
        [False, False, False,  ..., False, False, False]])
"""
여기서 선택된 토큰들을 103으로 변환 후 다시 inputs의 input_ids로 덮어씌우겠습니다.
selection = []

for i in range(mask_arr.shape[0]):
    selection.append(torch.flatten(mask_arr[i].nonzero()).tolist())

selection[:5]
"""
[[1, 12],
 [3, 8, 15],
 [13, 15, 17],
 [8, 17, 20, 21, 25, 29],
 [2, 6, 15, 16, 20, 28, 38, 45, 47, 85, 86, 87]]
"""

for i in range(mask_arr.shape[0]):
    inputs.input_ids[i, selection[i]] = 103 # MASK: 103

inputs.input_ids
"""
tensor([[  101,   103,  2026,  ...,     0,     0,     0],
        [  101,  2013,  1996,  ...,     0,     0,     0],
        [  101,  2013,  2026,  ...,     0,     0,     0],
        ...,
        [  101,  3459,  2185,  ...,     0,     0,     0],
        [  101,  2043, 15223,  ...,     0,     0,     0],
        [  101,  7887,  3288,  ...,     0,     0,     0]])
"""
그리고 huggingface의 BertForMaskedLM을 통해 학습시키줍니다.
# 데이터셋 지정
class MeditationsDataset(torch.utils.data.Dataset):
    def __init__(self, encodings):
        self.encodings = encodings
    def __getitem__(self, idx):
        return {key: torch.tensor(val[idx]) for key, val in self.encodings.items()}
    def __len__(self):
        return len(self.encodings.input_ids)

dataset = MeditationsDataset(inputs)
loader = torch.utils.data.DataLoader(dataset, batch_size=16, shuffle=True)

device = torch.device('cuda') if torch.cuda.is_available() else torch.device('cpu')
# and move our model over to the selected device
model.to(device)
model.train()

from transformers import AdamW
optimizer = AdamW(model.parameters(), lr = 1e-5)

from tqdm import tqdm
tqdm.pandas()

epochs = 2

for epoch in range(epochs):
    loop = tqdm(loader, leave=True)
    for batch in loop:
        optimizer.zero_grad()
        input_ids = batch['input_ids'].to(device)
        attention_mask = batch['attention_mask'].to(device)
        labels = batch['labels'].to(device)

        outputs = model(input_ids, attention_mask = attention_mask, labels = labels)

        loss = outputs.loss
        loss.backward()
        optimizer.step()
        loop.set_description(f'Epoch {epoch}')
        loop.set_postfix(loss=loss.item())
 """
Epoch 0: 100%|██████████| 32/32 [01:00<00:00,  1.89s/it, loss=0.852]
Epoch 1: 100%|██████████| 32/32 [01:00<00:00,  1.89s/it, loss=0.404]
 """
2.2.2. NSP
다음 문장 예측은 이진 분류 테스트로서, BERT에 두 문장을 입력하고 두 번째 문장이 첫 번째 문장의 다음 문장인지 예측합니다.
huggingface의 모델을 통해 학습 방법은 위의 MLM과 비슷하므로 어떤 방식으로 input과 output이 형성되는지를 알아보겠습니다.
from transformers import BertTokenizer, BertForPreTraining
import torch

tokenizer = BertTokenizer.from_pretrained('bert-base-uncased')
model = BertForPreTraining.from_pretrained('bert-base-uncased')

text = ("After Abraham Lincoln won the November 1860 presidential [MASK] on an "
        "anti-slavery platform, an initial seven slave states declared their "
        "secession from the country to form the Confederacy.")
text2 = ("War broke out in April 1861 when secessionist forces [MASK] Fort "
         "Sumter in South Carolina, just over a month after Lincoln's "
         "inauguration.")

inputs = tokenizer(text, text2, return_tensors='pt')
inputs
"""
{'input_ids': tensor([[  101,  2044,  8181,  5367,  2180,  1996,  2281,  7313,  4883,   103,
          2006,  2019,  3424,  1011,  8864,  4132,  1010,  2019,  3988,  2698,
          6658,  2163,  4161,  2037, 22965,  2013,  1996,  2406,  2000,  2433,
          1996, 18179,  1012,   102,  2162,  3631,  2041,  1999,  2258,  6863,
          2043, 22965,  2923,  2749,   103,  3481,  7680,  3334,  1999,  2148,
          3792,  1010,  2074,  2058,  1037,  3204,  2044,  5367,  1005,  1055,
         17331,  1012,   102]]), 'token_type_ids': tensor([[0, 0, 0, 0, 0, 0, 0, 0, 0, 0, 0, 0, 0, 0, 0, 0, 0, 0, 0, 0, 0, 0, 0, 0,
         0, 0, 0, 0, 0, 0, 0, 0, 0, 0, 1, 1, 1, 1, 1, 1, 1, 1, 1, 1, 1, 1, 1, 1,
         1, 1, 1, 1, 1, 1, 1, 1, 1, 1, 1, 1, 1, 1, 1]]), 'attention_mask': tensor([[1, 1, 1, 1, 1, 1, 1, 1, 1, 1, 1, 1, 1, 1, 1, 1, 1, 1, 1, 1, 1, 1, 1, 1,
         1, 1, 1, 1, 1, 1, 1, 1, 1, 1, 1, 1, 1, 1, 1, 1, 1, 1, 1, 1, 1, 1, 1, 1,
         1, 1, 1, 1, 1, 1, 1, 1, 1, 1, 1, 1, 1, 1, 1]])}
"""
이때, inputs의 token_type_ids에서 0과 1이 각 토큰이 a문장인지 b문장에 속하는지를 알려주는 값입니다.
그리고 임의의 라벨을 만들어서 model 예측값과 비교해보겠습니다.
label = torch.LongTensor([0])  # IsNext
outputs = model(**inputs, labels=label)

outputs.keys() # odict_keys(['prediction_logits', 'seq_relationship_logits'])
outputs.seq_relationship_logits # tensor([[ 6.0843, -5.6813]], grad_fn=<AddmmBackward0>)

torch.argmax(outputs.seq_relationship_logits) # tensor(0)
이번 포스팅에서는 BERT의 임베딩, 학습 방법 등을 전체적으로 알아보았습니다.
※ 본 포스팅은 <https://github.com/jamescalam/transformers/tree/main>과 <위키독스: Transformers (신경망 언어모델 라이브러리) 강좌>를 참고하여 작성했습니다.
'NLP' 카테고리의 다른 글
| [LLM#1] What? How? 트랜스포머(Transformer) (6) | 2024.11.15 |
|---|---|
| [NLP#5] LSTM (0) | 2023.07.02 |
| [NLP#4] 순환 신경망(RNN) (0) | 2023.06.28 |
| [NLP#3] 추론 기반(word2vec) (0) | 2023.05.17 |
| [NLP#2] 통계 기반 (0) | 2023.05.15 |